Всем привет, я только недавно начал изучать данный мир так что не судите строго.
Приобрел пару датчиков (BMP280 и HTU21D) и плату WeMos D1 mini Pro, попробовал подключить но так и не смог.
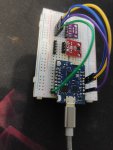
Схема подключения VCC > 3.3v, GND > G, SCL > D1, SDA > D2. Фото ниже
 Как во всех распространённых случаях ставят библиотеку Adafruit_BMP280 и я ее поставил. Включил их пример для теста, так вот после его компиляция и загрузки, плата вообще ничего не выводит просто пустой вывод.
Пробовал раскоменчивать строку с альтернативным способом инициализации и все так же ничего в выводе нет.
а стало
Перечитал кучу интернета, пробовал другие библиотеки, но не с какой не смог подключится, все выводили ошибку при инициализации.
После чего скачал скетч на скан адресов i2c и самое интересное он находит датчик по адресу 0x76
Так же пробовал вписать сразу в адрес в скобки инициализации bmp.begin(0x76), но и это не дало результата никакого...
Другая библиотека BMx280MI
Выдает следующие:
Так де думал попробовать подключить по SPI но как это сделать с платой wemos я не понял. Да, как я понимаю эти порты ввода-вывода (я про D1 и D2) могу сказать рабочие т.к. HTU21D прекрасно работает через них.
Подскажите пожалуйста, в чем собственно дело? Нерабочий датчик ? Я неправильно подключаю что-то ( я только начал изучать, могу чего-то не знать) ?
Приобрел пару датчиков (BMP280 и HTU21D) и плату WeMos D1 mini Pro, попробовал подключить но так и не смог.
Схема подключения VCC > 3.3v, GND > G, SCL > D1, SDA > D2. Фото ниже
Код:
/***************************************************************************
  This is a library for the BMP280 humidity, temperature & pressure sensor

  Designed specifically to work with the Adafruit BMP280 Breakout
  ----> http://www.adafruit.com/products/2651

  These sensors use I2C or SPI to communicate, 2 or 4 pins are required
  to interface.

  Adafruit invests time and resources providing this open source code,
  please support Adafruit andopen-source hardware by purchasing products
  from Adafruit!

  Written by Limor Fried & Kevin Townsend for Adafruit Industries.
  BSD license, all text above must be included in any redistribution
***************************************************************************/

#include <Wire.h>
#include <SPI.h>
#include <Adafruit_BMP280.h>

#define BMP_SCK  (13)
#define BMP_MISO (12)
#define BMP_MOSI (11)
#define BMP_CS   (10)

Adafruit_BMP280 bmp; // I2C
//Adafruit_BMP280 bmp(BMP_CS); // hardware SPI
//Adafruit_BMP280 bmp(BMP_CS, BMP_MOSI, BMP_MISO,  BMP_SCK);

void setup() {
  Serial.begin(9600);
  Serial.println(F("BMP280 test"));

  //if (!bmp.begin(BMP280_ADDRESS_ALT, BMP280_CHIPID)) {
  if (!bmp.begin()) {
    Serial.println(F("Could not find a valid BMP280 sensor, check wiring or "
                      "try a different address!"));
    while (1) delay(10);
  }

  /* Default settings from datasheet. */
  bmp.setSampling(Adafruit_BMP280::MODE_NORMAL,     /* Operating Mode. */
                  Adafruit_BMP280::SAMPLING_X2,     /* Temp. oversampling */
                  Adafruit_BMP280::SAMPLING_X16,    /* Pressure oversampling */
                  Adafruit_BMP280::FILTER_X16,      /* Filtering. */
                  Adafruit_BMP280::STANDBY_MS_500); /* Standby time. */
}

void loop() {
    Serial.print(F("Temperature = "));
    Serial.print(bmp.readTemperature());
    Serial.println(" *C");

    Serial.print(F("Pressure = "));
    Serial.print(bmp.readPressure());
    Serial.println(" Pa");

    Serial.print(F("Approx altitude = "));
    Serial.print(bmp.readAltitude(1013.25)); /* Adjusted to local forecast! */
    Serial.println(" m");

    Serial.println();
    delay(2000);
}
Пробовал раскоменчивать строку с альтернативным способом инициализации и все так же ничего в выводе нет.
Код:
if (!bmp.begin()) {
Код:
if (!bmp.begin(BMP280_ADDRESS_ALT, BMP280_CHIPID)) {После чего скачал скетч на скан адресов i2c и самое интересное он находит датчик по адресу 0x76
Код:
Scanning...
I2C device found at address 0x76  !
done
Код:
#include <Wire.h> //include Wire.h library

void setup()
{
  Wire.begin(); // Wire communication begin
  Serial.begin(9600); // The baudrate of Serial monitor is set in 9600
  while (!Serial); // Waiting for Serial Monitor
  Serial.println("\nI2C address Scanner CircuitSchools.com");
}

void loop()
{
  byte error, address; //variable for error and I2C address
  int devicecount;

  Serial.println("Scanning...");

  devicecount = 0;
  for (address = 1; address < 127; address++ )
  {
    // The i2c_scanner uses the return value of
    // the Write.endTransmisstion to see if
    // a device did acknowledge to the address.
    Wire.beginTransmission(address);
    error = Wire.endTransmission();

    if (error == 0)
    {
      Serial.print("I2C device found at address 0x");
      if (address < 16)
        Serial.print("0");
      Serial.print(address, HEX);
      Serial.println("  !");
      devicecount++;
    }
    else if (error == 4)
    {
      Serial.print("Unknown error at address 0x");
      if (address < 16)
        Serial.print("0");
      Serial.println(address, HEX);
    }
  }
  if (devicecount == 0)
    Serial.println("No I2C devices found\n");
  else
    Serial.println("done\n");

  delay(5000); // wait 5 seconds for the next I2C scan
}
Так же пробовал вписать сразу в адрес в скобки инициализации bmp.begin(0x76), но и это не дало результата никакого...
Другая библиотека BMx280MI
Код:
// BMx280_I2C.ino
//
// shows how to use the BMP280 / BMx280 library with the sensor connected using I2C.
//
// Copyright (c) 2018 Gregor Christandl
//
// connect the AS3935 to the Arduino like this:
//
// Arduino - BMP280 / BME280
// 3.3V ---- VCC
// GND ----- GND
// SDA ----- SDA
// SCL ----- SCL
// some BMP280/BME280 modules break out the CSB and SDO pins as well:
// 5V ------ CSB (enables the I2C interface)
// GND ----- SDO (I2C Address 0x76)
// 5V ------ SDO (I2C Address 0x77)
// other pins can be left unconnected.

#include <Arduino.h>
#include <Wire.h>

#include <BMx280I2C.h>

#define I2C_ADDRESS 0x76

//create a BMx280I2C object using the I2C interface with I2C Address 0x76
BMx280I2C bmx280(I2C_ADDRESS);

void setup() {
  // put your setup code here, to run once:
    Serial.begin(9600);

    //wait for serial connection to open (only necessary on some boards)
    while (!Serial);

    Wire.begin();

    //begin() checks the Interface, reads the sensor ID (to differentiate between BMP280 and BME280)
    //and reads compensation parameters.
    if (!bmx280.begin())
    {
        Serial.println("begin() failed. check your BMx280 Interface and I2C Address.");
        while (1);
    }

    if (bmx280.isBME280())
        Serial.println("sensor is a BME280");
    else
        Serial.println("sensor is a BMP280");

    //reset sensor to default parameters.
    bmx280.resetToDefaults();

    //by default sensing is disabled and must be enabled by setting a non-zero
    //oversampling setting.
    //set an oversampling setting for pressure and temperature measurements.
    bmx280.writeOversamplingPressure(BMx280MI::OSRS_P_x16);
    bmx280.writeOversamplingTemperature(BMx280MI::OSRS_T_x16);

    //if sensor is a BME280, set an oversampling setting for humidity measurements.
    if (bmx280.isBME280())
        bmx280.writeOversamplingHumidity(BMx280MI::OSRS_H_x16);
}

void loop() {
  // put your main code here, to run repeatedly:

    delay(1000);

    //start a measurement
    if (!bmx280.measure())
    {
        Serial.println("could not start measurement, is a measurement already running?");
        return;
    }

    //wait for the measurement to finish
    do
    {
        delay(100);
    } while (!bmx280.hasValue());

    Serial.print("Pressure: "); Serial.println(bmx280.getPressure());
    Serial.print("Pressure (64 bit): "); Serial.println(bmx280.getPressure64());
    Serial.print("Temperature: "); Serial.println(bmx280.getTemperature());

    //important: measurement data is read from the sensor in function hasValue() only.
    //make sure to call get*() functions only after hasValue() has returned true.
    if (bmx280.isBME280())
    {
        Serial.print("Humidity: ");
        Serial.println(bmx280.getHumidity());
    }
}
Код:
Soft WDT reset

>>>stack>>>

ctx: cont
sp: 3ffffdf0 end: 3fffffc0 offset: 01a0
3fffff90:  3fffdad0 3ffee73c 3ffee5b8 4020106c
3fffffa0:  feefeffe 00000000 3ffee790 40202838
3fffffb0:  feefeffe feefeffe 3ffe85e0 40100db5
<<<stack<<<

--------------- CUT HERE FOR EXCEPTION DECODER ---------------
Ż⸮:=ɍψ⸮begin() failed. check your BMx280 Interface and I2C Address.Подскажите пожалуйста, в чем собственно дело? Нерабочий датчик ? Я неправильно подключаю что-то ( я только начал изучать, могу чего-то не знать) ?