Andr82
New member
Здравствуйте. Прошу помощи с разбором кода (я полнейший чайник в этом вопросе). Ситуация такова, имея в наличии
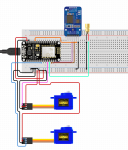
NodeMCU ESP 8266 (достался по случаю), попытался собрать игрушку для кота (тема избитая на ардуино). Получился вот такой набор элементов. Хочу понять какие строки(?) необходимо изменить в коде что бы данная конструкция ежесуточно запускалась, с движением серводвигателей по случайной траектории и включение лазерного диода, и прекращала работу минут через 15 - 20 до следующего дня. Я не прошу переписать код за меня, я надеюсь что мне подскажут куда копать и с какой литературой/сайтами следует ознакомиться. Заранее благодарен.
Хотя подозреваю что данный код может служит только для проверки сборки.
NodeMCU ESP 8266 (достался по случаю), попытался собрать игрушку для кота (тема избитая на ардуино). Получился вот такой набор элементов. Хочу понять какие строки(?) необходимо изменить в коде что бы данная конструкция ежесуточно запускалась, с движением серводвигателей по случайной траектории и включение лазерного диода, и прекращала работу минут через 15 - 20 до следующего дня. Я не прошу переписать код за меня, я надеюсь что мне подскажут куда копать и с какой литературой/сайтами следует ознакомиться. Заранее благодарен.
Код:
// Include Libraries
#include "Arduino.h"
#include "Laser.h"
#include "Wire.h"
#include "RTClib.h"
#include "Servo.h"


// Pin Definitions
#define LASER_PIN_S    0
#define SERVO9G1_1_PIN_SIG    2
#define SERVO9G2_2_PIN_SIG    14


// Global variables and defines
const int servo9g1_1RestPosition   = 20;  //Starting position
const int servo9g1_1TargetPosition = 150; //Position when event is detected
const int servo9g2_2RestPosition   = 20;  //Starting position
const int servo9g2_2TargetPosition = 150; //Position when event is detected
// object initialization
Laser laser(LASER_PIN_S);
RTC_DS3231 rtcDS;
Servo servo9g1_1;
Servo servo9g2_2;


// define vars for testing menu
const int timeout = 10000;       //define timeout of 10 sec
char menuOption = 0;
long time0;

// Setup the essentials for your circuit to work. It runs first every time your circuit is powered with electricity.
void setup()
{
    // Setup Serial which is useful for debugging
    // Use the Serial Monitor to view printed messages
    Serial.begin(9600);
    while (!Serial) ; // wait for serial port to connect. Needed for native USB
    Serial.println("start");

    if (! rtcDS.begin()) {
    Serial.println("Couldn't find RTC");
    while (1);
    }
    if (rtcDS.lostPower()) {
    Serial.println("RTC lost power, lets set the time!");
    // following line sets the RTC to the date & time this sketch was compiled
    rtcDS.adjust(DateTime(F(__DATE__), F(__TIME__)));
    // This line sets the RTC with an explicit date & time, for example to set
    // January 21, 2014 at 3am you would call:
    // rtcDS.adjust(DateTime(2014, 1, 21, 3, 0, 0));
    }
    servo9g1_1.attach(SERVO9G1_1_PIN_SIG);
    servo9g1_1.write(servo9g1_1RestPosition);
    delay(100);
    servo9g1_1.detach();
    servo9g2_2.attach(SERVO9G2_2_PIN_SIG);
    servo9g2_2.write(servo9g2_2RestPosition);
    delay(100);
    servo9g2_2.detach();
    menuOption = menu();

}

// Main logic of your circuit. It defines the interaction between the components you selected. After setup, it runs over and over again, in an eternal loop.
void loop()
{


    if(menuOption == '1') {
    // 650nm Red Laser Diode - Test Code
    // The laser will turn on and off for 500ms (0.5 sec)
    laser.on();       // 1. turns on
    delay(500);             // 2. waits 500 milliseconds (0.5 sec). Change the value in the brackets (500) for a longer or shorter delay in milliseconds.
    laser.off();      // 3. turns off.
    delay(500);             // 4. waits 500 milliseconds (0.5 sec). Change the value in the brackets (500) for a longer or shorter delay in milliseconds.
    }
    else if(menuOption == '2') {
    // RTC - Real Time Clock - Test Code
    //This will display the time and date of the RTC. see RTC.h for more functions such as rtcDS.hour(), rtcDS.month() etc.
    DateTime now = rtcDS.now();
    Serial.print(now.month(), DEC);
    Serial.print('/');
    Serial.print(now.day(), DEC);
    Serial.print('/');
    Serial.print(now.year(), DEC);
    Serial.print("  ");
    Serial.print(now.hour(), DEC);
    Serial.print(':');
    Serial.print(now.minute(), DEC);
    Serial.print(':');
    Serial.print(now.second(), DEC);
    Serial.println();
    delay(1000);
    }
    else if(menuOption == '3') {
    // 9G Micro Servo #1 - Test Code
    // The servo will rotate to target position and back to resting position with an interval of 500 milliseconds (0.5 seconds)
    servo9g1_1.attach(SERVO9G1_1_PIN_SIG);         // 1. attach the servo to correct pin to control it.
    servo9g1_1.write(servo9g1_1TargetPosition);  // 2. turns servo to target position. Modify target position by modifying the 'ServoTargetPosition' definition above.
    delay(500);                              // 3. waits 500 milliseconds (0.5 sec). change the value in the brackets (500) for a longer or shorter delay in milliseconds.
    servo9g1_1.write(servo9g1_1RestPosition);    // 4. turns servo back to rest position. Modify initial position by modifying the 'ServoRestPosition' definition above.
    delay(500);                              // 5. waits 500 milliseconds (0.5 sec). change the value in the brackets (500) for a longer or shorter delay in milliseconds.
    servo9g1_1.detach();                    // 6. release the servo to conserve power. When detached the servo will NOT hold it's position under stress.
    }
    else if(menuOption == '4') {
    // 9G Micro Servo #2 - Test Code
    // The servo will rotate to target position and back to resting position with an interval of 500 milliseconds (0.5 seconds)
    servo9g2_2.attach(SERVO9G2_2_PIN_SIG);         // 1. attach the servo to correct pin to control it.
    servo9g2_2.write(servo9g2_2TargetPosition);  // 2. turns servo to target position. Modify target position by modifying the 'ServoTargetPosition' definition above.
    delay(500);                              // 3. waits 500 milliseconds (0.5 sec). change the value in the brackets (500) for a longer or shorter delay in milliseconds.
    servo9g2_2.write(servo9g2_2RestPosition);    // 4. turns servo back to rest position. Modify initial position by modifying the 'ServoRestPosition' definition above.
    delay(500);                              // 5. waits 500 milliseconds (0.5 sec). change the value in the brackets (500) for a longer or shorter delay in milliseconds.
    servo9g2_2.detach();                    // 6. release the servo to conserve power. When detached the servo will NOT hold it's position under stress.
    }

    if (millis() - time0 > timeout)
    {
        menuOption = menu();
    }

}


// Menu function for selecting the components to be tested
// Follow serial monitor for instrcutions
char menu()
{

    Serial.println(F("\nWhich component would you like to test?"));
    Serial.println(F("(1) 650nm Red Laser Diode"));
    Serial.println(F("(2) RTC - Real Time Clock"));
    Serial.println(F("(3) 9G Micro Servo #1"));
    Serial.println(F("(4) 9G Micro Servo #2"));
    Serial.println(F("(menu) send anything else or press on board reset button\n"));
    while (!Serial.available());

    // Read data from serial monitor if received
    while (Serial.available())
    {
        char c = Serial.read();
        if (isAlphaNumeric(c))
        {

            if(c == '1')
                Serial.println(F("Now Testing 650nm Red Laser Diode"));
            else if(c == '2')
                Serial.println(F("Now Testing RTC - Real Time Clock"));
            else if(c == '3')
                Serial.println(F("Now Testing 9G Micro Servo #1"));
            else if(c == '4')
                Serial.println(F("Now Testing 9G Micro Servo #2"));
            else
            {
                Serial.println(F("illegal input!"));
                return 0;
            }
            time0 = millis();
            return c;
        }
    }
}