• Уважаемые посетители сайта esp8266.ru!
    Мы отказались от размещения рекламы на страницах форума для большего комфорта пользователей.
    Вы можете оказать посильную поддержку администрации форума. Данные средства пойдут на оплату услуг облачных провайдеров для сайта esp8266.ru
  • Система автоматизации с открытым исходным кодом на базе esp8266/esp32 микроконтроллеров и приложения IoT Manager. Наша группа в Telegram

Обсуждение Программатор для TLSR

G0V

New member
The E180-Z6907A Modul has 12Mhz Osci but the bytepatched BDT firmware expects 16Mhz so it will not run and needs further tweaking or the replacement of the Osci to 16Mhz
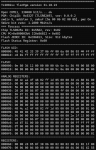
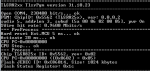
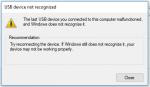
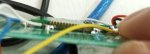
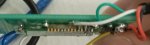
It is indeed unable to run directly. I burned the firmware "evk8269v3.5.pb0-sws.bin" to the E180-Z6907A module using the "TLSR Tool ver 0.0.1.6" PC software through the STM32F103C8T6 (USB2Swire-STM32F103C8-v06.hex). The black and red power wires of the USB data cable are connected to a 3.3V linear regulator, which then powers the E180-Z6907A module. The green wire of the USB data cable is connected to the PE3/DP of the E180-Z6907A module, and the white wire is connected to the PE2/DM. Then, the USB-A plug is inserted into the PC's USB interface. A prompt pops up in the bottom right corner of the PC:
2025年4月27日113622.jpg
After clicking:
a93321c0-a2e3-4013-9484-37d9898c5f8b.png
How to modify "evk8269v3.5.pb0-sws.bin" to make its working frequency match the 12MHz of E180-Z6907A?

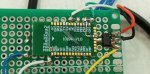
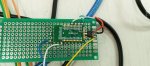
Note: I have already soldered and attached the module's shield to the motherboard, if you want to replace the crystal of the E180-Z6907A module, it will be more troublesome to disassemble the shield.
微信图片_20250427114758.jpg
微信图片_20250427114814.jpg
微信图片_20250427114817.jpg
:unsure:
 

Вложения

pvvx

Активный участник сообщества
Firmware v3.5 for BDT is a very old version. Current firmware version for BDT is ver4.6.
To work with the old version of FW you will need the old version of BDT program.
I modified the binary code of the v3.5 firmware by disassembling it in "Ghidra". Then by manually changing and inserting the binary code responsible for the frequencies of the quartz and pins.
It was over 6 years ago and nothing was saved. And there was nothing to save - I modified the binary file manually in HEX format...
 

pvvx

Активный участник сообщества
EVK-BDT has a 12 MHz quartz.
If the module has a 12 MHz quartz, it means that fewer patches of the original firmware from Telink-EVK are required.
The latest firmwares versions are located in the "BDT\config\fw" directory after installing BDT.
 

pvvx

Активный участник сообщества
There are no debugging functions for IDE in BDT. There is only a primitive interface for outputting values from memory via a MAP file and a CPU stop function. This is not an analogue of the functionality of other MCUs via Jtag. This is a very primitive function in BDT, with which it is impossible to debug.
All BDT functions, except for the unnecessary interface for outputting values from memory via a MAP file, are implemented in TLSRPGM. If you know Python, you can also add debugging, since the TLRPGM firmware has all the functions for this.
And TLSRPGM works much faster than BDT-EVK. It is more difficult to work with BDT when flashing various thermometers and other ready-made devices.
That is why I do not use BDT-EVK.
 

G0V

New member

Why do you need a BDT emulator anyway?
Okay, thanks for sharing the related materials about reverse engineering TC32.
I haven't used Telink BDT.exe before, so I want to try it out. I just started learning about the TLSR8258 chip two weeks ago and need to use it to implement some simple functions. Therefore, I began to learn about information related to the TLSR8258. Since I haven't used the software tools before, I want to try them out and experience the fun of trying new things and tinkering with them.
 

G0V

New member
There are no debugging functions for IDE in BDT. There is only a primitive interface for outputting values from memory via a MAP file and a CPU stop function. This is not an analogue of the functionality of other MCUs via Jtag. This is a very primitive function in BDT, with which it is impossible to debug.
All BDT functions, except for the unnecessary interface for outputting values from memory via a MAP file, are implemented in TLSRPGM. If you know Python, you can also add debugging, since the TLRPGM firmware has all the functions for this.
And TLSRPGM works much faster than BDT-EVK. It is more difficult to work with BDT when flashing various thermometers and other ready-made devices.
That is why I do not use BDT-EVK.
I also bought the TB-03F-KIT development board at the same time, and when I have time, I will try TLSRPGM.
Yes, Python scripts can be used to write some customized functions with the assistance of DeepSeek
 

G0V

New member
Firmware v3.5 for BDT is a very old version. Current firmware version for BDT is ver4.6.
To work with the old version of FW you will need the old version of BDT program.
I modified the binary code of the v3.5 firmware by disassembling it in "Ghidra". Then by manually changing and inserting the binary code responsible for the frequencies of the quartz and pins.
It was over 6 years ago and nothing was saved. And there was nothing to save - I modified the binary file manually in HEX format...
When importing evk8269v3.5.pb0-sws.bin into Ghidra, which "Language" should be chosen? The contents of cmp32.txt and cmp35.txt are all about what, can't understand
 

Вложения

G0V

New member
[引用="pvvx, 帖子: 100267, 用户: 6"]
There are no debugging functions for IDE in BDT. There is only a primitive interface for outputting values from memory via a MAP file and a CPU stop function. This is not an analogue of the functionality of other MCUs via Jtag. This is a very primitive function in BDT, with which it is impossible to debug.
BDT 中没有针对 IDE 的调试功能。仅有一个通过 MAP 文件从内存输出值的原始接口和 CPU 停止功能。这与其他 MCU 通过 Jtag 实现的功能并不等同。BDT 中的这项功能非常基础,无法用于实际调试。
All BDT functions, except for the unnecessary interface for outputting values from memory via a MAP file, are implemented in TLSRPGM. If you know Python, you can also add debugging, since the TLRPGM firmware has all the functions for this.
除了通过 MAP 文件从内存输出值的非必要接口外,BDT 的所有功能已在 TLSRPGM 中实现。若您熟悉 Python,还可添加调试功能,因为 TLRPGM 固件已包含相关支持。
And TLSRPGM works much faster than BDT-EVK. It is more difficult to work with BDT when flashing various thermometers and other ready-made devices.
且 TLSRPGM 的运行速度远超 BDT-EVK。在烧录各类温度计等成品设备时,使用 BDT 更为繁琐。
That is why I do not use BDT-EVK.
正因如此,我选择不使用 BDT-EVK。
[/引用结束]
TlsrPgm is also used 0vDx9eUCh6.png
 

Drucha

New member
Надо: Дизасм в Ghidra, заменить команды обращения к портам GPIO и стартовую настройку частоты кварца.
Пробую разобрать прошивку в Ghidra для последующего изменения частоты кварца под модуль E180-Z6907A.
Пробовал в двух версиях Ghidra: старой 9.2.4 и крайней 11.3.2. Пробовал разные версии прошивок: оригинальные 3.5, 4.6 и Ваши evk8269v3.5.pb0-power.
Результат один и тот же - декомпиляция не проходит.
С AVR-кам декомпиляция работает нормально.
Предполагаю, что компиляция поддеожки TELink проходит с ошибками т.к. есть предупреждения в логах.
CB_924.pngLog_924.pngCB_1132.pngLog_1132_1.pngLog_1132_2.png
 

Sergey_62

New member
Why do you need a BDT emulator anyway?
Здравствуйте!
Решил я модернизировать потолочные светодиодные светильники и переделать управление им с IR на ZigBee (для начала, под умный дом Tuya).
Приобрёл модули ZTU (на TLSR8258). Сконфигурировал проект в Tuya Developer Platform и получил две бесплатные лицензии и прошивку. «Сделал» TLSRPGM из TB-03F-KIT. Прошил модуль ZTU с помощью TLSRPGM. Подключил к умному дому Tuya, а модуль не управляется. После продолжительной переписки с поддержкой Tuya Developer Platform выяснилось, что модуль ещё надо авторизовать, а сделать это можно только онлайн, через их приложение TYMZ и с помощью программатора EVK.
Так что в данной ситуации без EVK ни как не обойтись. А покупать его только для этого, чтобы он потом валялся без дела, не хочется, тем более, когда есть TLSRPGM, ещё и с открытыми исходниками.
Старых модулей E104-BT10 в продаже уже нет. Есть только новые E180-Z6907A, но для них не подходят ни оригинальные, ни доработанные pvvx прошивки.
 

Hunter32

New member
Здравствуйте!
Решил я модернизировать потолочные светодиодные светильники и переделать управление им с IR на ZigBee (для начала, под умный дом Tuya).
Приобрёл модули ZTU (на TLSR8258). Сконфигурировал проект в Tuya Developer Platform и получил две бесплатные лицензии и прошивку. «Сделал» TLSRPGM из TB-03F-KIT. Прошил модуль ZTU с помощью TLSRPGM. Подключил к умному дому Tuya, а модуль не управляется. После продолжительной переписки с поддержкой Tuya Developer Platform выяснилось, что модуль ещё надо авторизовать, а сделать это можно только онлайн, через их приложение TYMZ и с помощью программатора EVK.
Так что в данной ситуации без EVK ни как не обойтись. А покупать его только для этого, чтобы он потом валялся без дела, не хочется, тем более, когда есть TLSRPGM, ещё и с открытыми исходниками.
Старых модулей E104-BT10 в продаже уже нет. Есть только новые E180-Z6907A, но для них не подходят ни оригинальные, ни доработанные pvvx прошивки.
Модуль только прошивается программатором, без разницы evk или tlsrpgm, а авторизуется он уже по uart, любым адаптером.
 

pvvx

Активный участник сообщества
Кто такая “авторизация”?

Для прошивки Zigbee или любой другой ни каких “авторизаций” не требуется.
Авторизация нужна только для Tyua Cloud.
 

Sergey_62

New member
Кто такая “авторизация”?

Для прошивки Zigbee или любой другой ни каких “авторизаций” не требуется.
Авторизация нужна только для Tyua Cloud.
Вот что прислала поддержка Tuya:
The program in the module is not your own product. Would you mind sharing how you burned the program?
If you purchased an empty delivery module, refer to the document Burn your own product program by pasting a token with Tuya Production Solution


1744351460875fd8a1edd.png17443514676b1faa87d8d.png
 

Hunter32

New member
Кто такая “авторизация”?

Для прошивки Zigbee или любой другой ни каких “авторизаций” не требуется.
Авторизация нужна только для Tyua Cloud.
Без этой "авторизации" не хватает части в прошивке, которая отвечает за назначение пинов и за ключи tuya. Я сравнивал прошивку до и после "авторизации", после основной прошивки добавляется эта часть.
 

pvvx

Активный участник сообщества
Запись о пинах у вас открыта и пишется в Flash напрямую, в текстовом виде.
  • Кто вам мешает заменить программу bdt на свою?
  • Нафига такие прошивки, которые работают только с Tuya Cloud?
Плюс прошивки Zigbee от Tuya рассчитаны на TLSR8258 c 1МБ Flash. А модули с али имеют другие TLSR825x и Flash 512 КБ... Telink дает все SDK c типовыми проектами. По этому проще собрать свою прошивку
 

Sergey_62

New member
Кто вам мешает заменить программу bdt на свою?
EVK пушут не нужен:
Модуль только прошивается программатором, без разницы evk или tlsrpgm, а авторизуется он уже по uart, любым адаптером.
Но у меня пока не получилось.

Нафига такие прошивки, которые работают только с Tuya Cloud?
Потому, что уже есть экосистема Tuya с примерно 20 устройствами. И казалось, что "сконструировать" и добавить ещё два своих будет относительно просто.
Позже планирую перейти или на Home Assistant или SLS.

Плюс прошивки Zigbee от Tuya рассчитаны на TLSR8258 c 1МБ Flash. А модули с али имеют другие TLSR825x и Flash 512 КБ...
Мои модули ZTU c 1МБ Flash.
ZTU.png
 

pvvx

Активный участник сообщества
Потому, что уже есть экосистема Tuya с примерно 20 устройствами. И казалось, что "сконструировать" и добавить ещё два своих будет относительно просто.
Это с текущими отключениями и тенденциями с интернетом в России вообще не актуально.
Актуальны только автономные системы умного дома с возможностью внешнего доступа.

... Для одного-двух устройств достаточно просто скопировать FullFlash с готового устройства и поменять MAC/IEEE.
 
Сверху Снизу